

You’ll navigate clipper guards #0 through #8 to achieve precise cuts, with each increment adding roughly 1/8 inch in length. A #1 guard cuts 1/8 inch, while #4 delivers 1/2 inch for medium lengths. However, guard sizes vary between brands—a #1 Oster measures 2.4 mm versus 3 mm for Wahl. Adjustable taper levers enable micro-adjustments for seamless blending. Understanding these measurements and brand differences guarantees you’ll execute polished fades and professional results across any clipper system.
Standard Clipper Guard Sizes: The Baseline Reference
Understanding clipper guard sizes is essential for achieving consistent, predictable haircut results. You’ll find that standard clipper guards progress from #0 to #8, with each increment adding approximately 1/8 inch in length. The #1 guard, cutting at 1/8 inch (3 mm), serves as your foundational reference point for buzz cuts.
When selecting guards, you’re controlling precise hair length: #2 delivers 1/4 inch, #3 provides 3/8 inch, and #4 cuts 1/2 inch. Higher numbers like #7 and #8 offer 22–25 mm for styling flexibility and length maintenance. Starting with a longer guard and working down is advisable, since hair cannot be added back once cut. Many clipper models also feature clipper levers that add approximately 1/16 inch when opened, providing additional precision for fade techniques.
Guard compatibility varies considerably by clipper type, so you’ll need to verify your specific model’s specifications. Major brands like Wahl, Andis, and Oster maintain standard guard measurements, though minor variations may exist between manufacturers. Regular clipper maintenance—including guard cleaning and blade alignment—ensures maximum performance across your entire set. You’ll achieve superior results when guards attach securely and operate smoothly.

High Quality: Constructed from robust nylon material. Flexible and sturdy like the original.

▶Premium Value & Complete Set Get 10 durable Clipper Guards in one pack for unmatched value. Our set includes the most needed sizes from 1.5mm to 25mm for versatile cutting and fading.

14 Piece Kit: Includes hair clipper guards from 1/2 (1/16") all the way up to 8 (1")
Why Guards Vary Across Brands: Wahl, Andis, and Oster
Because clipper guards carry identical numbering systems across manufacturers, you’d reasonably expect a #1 guard to cut the same length regardless of brand—but that’s not the case. Manufacturing tolerances create significant measurement discrepancies between comparable models. A #1 Oster metal guard measures 2.4mm while a #1 Wahl plastic guard measures 3mm—a difference you’ll notice in results. These variations stem from material composition, design philosophy, and production standards unique to each manufacturer. Brand compatibility remains limited primarily within brand families rather than universally across Wahl, Andis, and Oster. Even attempts at standardization, like A5 blade universal sizing, haven’t eliminated guard variation. Just as electric shavers for sensitive skin require careful selection based on brand specifications rather than assumptions, clipper guards demand verification of actual measurements. Regular maintenance with light mineral oils helps preserve blade sharpness and clipper longevity across all brands. When switching between clipper systems, you must verify specific measurements rather than rely on matching numbers alone. Size charts for guards are available for all brands, detailing measurements in inches and mm for enhanced clarity when comparing options.
Extended Clipper Guard Sizes: Going Longer Than #4
When you need to leave more than 1/2 inch of hair, standard guards #1 through #4 won’t deliver the length you’re after. Extended guard applications require you to understand sizes beyond the traditional lineup.
Guards #5 through #8 progressively increase length from 5/8 inch to 1 inch. For even longer cuts, you’ll find extended guards ranging from 28-34mm, equivalent to sizes 8-12. These extended guard applications suit very long trims, shaping, and layering without drastically reducing hair length. The taper lever can be adjusted to create a 1/16-inch difference in length for more refined blending between guard sizes.
When choosing extended sizes, focus on millimeter or inch measurements rather than numbers alone, since brands vary considerably. Start with a longer guard to avoid over-cutting. For sensitive skin areas, consider using wet shavers which cause less irritation than manual blades. You can always use lever adjustments to fine-tune length without changing guards, giving you precise control over your final result. After each use, maintain your clippers by applying clipper oil to keep blades in optimal working condition.

【Complete Set for Versatile Styling】 This clipper guard kit includes 10 colorful guide combs in full sizes (1.5mm, 3mm, 4.5mm, 6mm, 10mm, 13mm, 16mm, 19mm, 22mm, 25mm) to meet a wide range of haircut lengths, from precise trims to longer cuts. It also comes with 2 black ear taper combs (left & right) for clean edging around the ears. The set is equipped with a cleaning brush, blade oil, and a convenient storage bag, making organization and maintenance easy. Multiple size options allow you to achieve buzz cuts, fades, layered trims, and various hair lengths with confidence.

Precise Long Haircuts: Includes 1-1/4" (#10) and 1-1/2" (#12) attachment guards, crafted with precision, these guards maintain consistent cutting lengths - ideal for achieving tailored, longer hairstyles at home with ease.

Color Coded: Each guards with a different color and different cutting lengths. Grab quickly based on the identity of color. Please note that the color are randomly assigned.
Pick Your Haircut: Which Guard Numbers to Use
Now that you’ve got the extended guard sizing down, you’re ready to match those numbers to actual haircut styles. Your guard selection directly shapes styling versatility and maintenance requirements based on client preferences. Buzz cuts demand uniformity—you’ll apply #2 guards across all areas for minimal upkeep. Crew cuts utilize #4 guards, positioning you at the medium-length boundary. For textured styles, you’ll progress from #3 on lower sides to #5 on upper sides, finishing with #8 on top for maximum styling flexibility. Side parts combine #4 on sides with #8 on top, supporting product-based styling. Professional clippers with adjustable taper levers allow you to make micro-adjustments between guard sizes for seamless blending during your cut. Remember that cutting against hair growth improves consistency and prevents missing hairs during your blending process. For body grooming applications, consider that foil shavers offer an alternative approach to clipper guards when working on sensitive skin areas. Each recommended style reflects specific guard combinations that balance aesthetic goals with practical grooming needs, ensuring you achieve precise results tailored to individual client requirements.

Color Coded Guide Combs – Finding and remembering everyone’s favorite hair length is easier than ever. Corresponding the correct comb to the right cutting length is simple with our easy to see attachment guards

Heavy Duty Motor – Our ultra-power heavy duty hair trimming system easily cuts the thickest hair with 35 percent more power than standard Wahl electromagnetic motor clippers, This results in a very strong audible hum, but is completely normal to its operation. Don’t settle for a weak clipper.
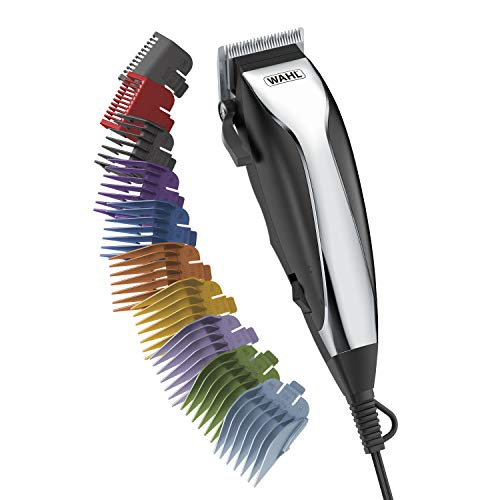
Multi-Cut Hair Clipper - Heavy duty motor for exceptional power and no-snag cutting; features an adjustable taper lever for easy blending and fading. This results in a very strong audible hum, but is completely normal to its operation. Don’t settle for a weak clipper.
Blend a Fade Like a Pro: Cutting Techniques Explained
Mastering fade techniques requires understanding how guard progression, clipper settings, and blending motions work together to create seamless changes between lengths. You’ll start by switching to shorter guards like #0 or #1 to establish your fade line, defining your chosen style—high, mid, or low. Next, you’ll apply flicking motions for smooth shifts between lengths, progressively moving from longer to shorter clipper settings. You’ll employ clipper-over-comb and scissor-over-comb techniques to eliminate harsh lines. Use angular clipper positions to decrease friction against skin, ensuring clean results. Finally, you’ll soften corners and blend your top into sides using inverted clipper techniques on stubborn cowlicks, creating the polished fade you’re after. Just as selecting the right safety razor blades can transform your shaving results, choosing quality clipper blades designed for precision work will significantly impact the sharpness and consistency of your fade lines. Professional tools like magnetic guard systems provide precision and consistency for intricate fade work. Working in a clean and well-lit workspace with your tools laid out within easy reach will help you execute these techniques with precision and consistency.
Clipper Guard Size Conversion Chart: Quick Lookup
You’ve learned the techniques that make fades look polished, but executing them depends on knowing exactly what each clipper guard delivers. This conversion chart provides quick reference for guard measurements across standard sets. Guard #1 at ⅛ inch converts to open lever positioning, while closed #1½ equals ¼ inch—matching open #1 settings. Understanding guard size enhancements through lever adjustments optimizes your fade blending; opening the lever on #3 reaches 7/16 inch for seamless alterations. Clipper compatibility tips require checking your specific brand, as some models vary slightly in increment spacing. Hair clipper guards are numbered from #0 to #8, representing different lengths that enable quick bulk cutting while maintaining desired hair length. Professional-grade clippers like the Wahl 5-Star Magic Clip feature staggered blades that enhance precision when working with various guard sizes. For optimal performance, consider zero gapping your clippers to eliminate gaps between blades for cleaner, closer cuts and improved results. Reference closed measurements for precise cuts, then leverage open positions for gradient effects. Memorizing these conversions streamlines your workflow, ensuring consistent results regardless of clipper type.


