
You’ll start by powering down your trimmer and detaching the blade head. Use your cleaning brush to dry brush away hair clippings from the blade slots and teeth, focusing on crevices where buildup occurs. Rinse the detached head under running water with gentle pressure, then vigorously shake off excess water and air dry it completely on a soft towel. Reattach your blade, confirm the audible snap, and place the trimmer on its wireless charging dock. For thorough guidance on blade replacement schedules and water exposure limitations, explore the detailed steps ahead.
Prepare Your Trimmer for Cleaning
To properly prepare your Manscaped trimmer for cleaning, you’ll want to start with a dry brush pass using the included brush to remove hair clippings from the blade slots and teeth. This dry cleaning step prevents hair from clumping during wet cleaning and should be performed after every trim as part of your essential maintenance tips.
Brush the blade head thoroughly, including underneath where debris accumulates. Don’t skip this phase—dry cleaning often serves as your only required post-trim step, depending on cleaning frequency and usage intensity. Confirm the trimmer is off and detached before you begin any cleaning procedures. Since your trimmer is waterproof, you can also perform wet cleaning by rinsing detachable parts under running water for a more thorough cleanse.
Establishing regular cleaning frequency prevents oil and dirt buildup that compromises performance. For deeper maintenance, consider using lubricant oil periodically to ensure optimal function and longevity. By incorporating this dry brush preparation into your routine maintenance tips, you’ll guarantee your trimmer remains hygienic and functions effectively for years.
Turn Off and Disassemble All Parts
Before you disassemble your Manscaped trimmer, you’ll need to power it down completely by pressing the power button—this essential safety step prevents accidental motor activation during component removal. Next, position the trimmer vertically with blade teeth facing upward to facilitate access and align the blade slot properly.
Press the top of the blade outward with your thumb until it snaps free from its slot. This exposes underlying areas for thorough cleaning. For deeper maintenance tips, pry the back cover seam using a guitar pick or tab tool, then remove the two screws from the trimmer body’s underside.
Release the side clips after detaching the back piece. Store the device in a cool, dry place when not in use to prevent moisture damage and battery corrosion that could compromise internal components. Regular disassembly and maintenance prevents fungal and bacterial growth that can accumulate on internal components. After disassembly, apply clipper oil to the blade components to maintain optimal performance and blade longevity. Throughout this process, observe critical safety precautions: use only a Phillips screwdriver and pry tool, handle glued sections gently, and avoid forceful pulls that could damage internal contacts or the waterproof gasket.

Rust Prevention – Prevents rust from forming & helps extend the life of the clipper & blades; can also reduce the likelihood of blades becoming dull

【1x Premium Lubricating Oil】Effectively reduces operating noise and temperature, lubricates internal components, prevents metal part rust, and extends the service life of electric clippers. This mild, skin-friendly mineral lubricant features low viscosity and strong penetration—no compromise to clipper performance during use.

Rust Prevention – Prevents rust from forming & helps extend the life of the clipper & blades; can also reduce the likelihood of blades becoming dull
Dry Brush Hair From Blade Slots
Now that you’ve disassembled your trimmer, you’ll start the dry cleaning process by using the included cleaning brush to remove hair clippings from the blade slots and between the blade teeth. Apply gentle, consistent pressure while working systematically across the entire blade surface. Focus your brush strokes on areas where hair accumulation’s most common, particularly in the slots and crevices.
Continue brushing until no visible hair clippings remain. This brush maintenance step’s essential for ideal grooming efficiency and should be performed immediately after trimming, before hair dries. Regular cleaning after use prevents hair from hardening and becoming difficult to remove. Performing this dry brushing step before disinfection with 70% isopropyl alcohol ensures maximum effectiveness of your cleaning routine. Your methodical approach guarantees complete coverage and prevents residue buildup that could compromise blade performance. Successfully removing all trimmings readies your trimmer for storage or next use, and maintaining your trimmer after each grooming session promotes hygiene, performance, and longevity.
Rinse the Trimmer Head Under Running Water
After dry brushing, rinse the detached trimmer head under running water to remove remaining hair clippings and debris. Hold the blade head directly beneath the faucet stream, directing water flow across the blade slots and teeth. Use gentle water pressure to dislodge trapped hair without damaging internal components. Your rinsing techniques should focus on targeted areas where hair and oil residue accumulate most heavily. Continue rinsing until you’ve eliminated all loose particles. For optimal results, brush away excess hair before rinsing to ensure the wet cleaning process is most effective. The ceramic blades in the 4.0 model are designed to prevent nicks and tugging during both trimming and cleaning, making them ideal for sensitive skin grooming where delicate areas require extra care. For blade maintenance, this process preserves the SkinSafe™ blade performance and prevents bacterial growth. Once complete, shake off excess water thoroughly. Lay the trimmer head on a clean towel for air drying before reassembly and storage in a dry environment.
Shake, Wipe, and Air Dry
Vigorously shake the trimmer head to expel excess water from blade crevices and device components. This technique removes pooling moisture that’d otherwise extend drying time and compromise your device’s longevity.
Next, place your trimmer on a small, soft towel in a well-ventilated area. Air drying is the recommended method for complete moisture evaporation—it eliminates lint residue that cloth wiping leaves behind. Position your removed blade head separately on the towel to guarantee thorough drying around all cutting surfaces. For optimal blade maintenance, use the included brush to gently remove any remaining debris from the blade edges before air drying. Professional-grade clippers benefit from similarly rigorous drying protocols to maintain their powerful motors and extend operational lifespan, much like the 100% waterproof design found in advanced electric razors.
The SkinSafe™ ceramic blade benefits greatly from proper drying practices despite its rust-resistance properties. Confirm complete dryness before reattachment and storage. Store your fully dried trimmer in a dry environment to prevent excess moisture reaccumulation and maintain peak performance during your next grooming session.
Reassemble and Confirm the Blade Clicks
You’re ready to reinstall your blade—a critical step that requires careful positioning and confirmation. Position the trimmer vertically with blade teeth facing upward. Insert the new blade into the open slot, ensuring proper blade alignment with the grooves. Press gently on the back until you hear a distinct snap—this snap confirmation verifies secure engagement.
Listen carefully for the audible click indicating full insertion. Visually inspect that the blade sits flush without gaps or wobble. Power on your trimmer and press the button once; the LED should illuminate. Run the trimmer briefly to confirm smooth blade movement without vibration. Like premium electric razors that feature powerful motors for handling various facial hair types, your trimmer’s powerful motor should operate smoothly during this test. Proper blade alignment with the correct tension and positioning ensures optimal cutting performance. Finally, engage the travel lock by pressing the power button three times, then deactivate it to verify normal operation. Ensure the trimmer remains stable during this final verification step. Your trimmer is now properly reassembled.
Charge Your Trimmer After Reassembly
Once you’ve confirmed proper blade engagement and verified smooth operation, it’s time to restore your trimmer’s battery. Place your reassembled trimmer directly on the wireless charging dock—no connectors required. The dock’s induction method delivers power automatically when you position the device correctly.
A full charge takes up to five hours maximum, though faster charging occurs if your battery isn’t completely depleted. This battery maintenance approach guarantees ideal longevity and performance. The wireless charging stand comes included in the packaging for convenient charging. Similar to electric shavers that feature self-sharpening blades, maintaining proper charging habits ensures your trimmer’s cutting performance remains optimal over time. For optimal results, pair your trimmer with trimming as your primary grooming method to maximize the effectiveness of your tool’s capabilities.
Monitor the tri-level LED indicator system during charging. Three illuminated lights signal a full charge, with lights darkening sequentially as battery capacity depletes. No lights indicate a dead battery.
These charging techniques prepare your trimmer for 90 minutes of continuous runtime, supporting multiple grooming sessions. Regular post-cleaning charging prevents deep discharge and extends overall battery lifespan.

Wireless Fast Charging&Automatic power-off: Charger for Manscaped does not need to be plugged in or out. Just put the shaver easily on the base and the base will start charging. When the shaver is picked up, the indicator light on the charging base automatically turns off to avoid interfering with your experience and make your operation more comfortable.Wireless charging will automatically stop at 98% battery level, which can effectively protect the battery. This feature is not available to other competitors. Other competitors' products still generate heat when using Manscaped 4.0 next day after full charged.
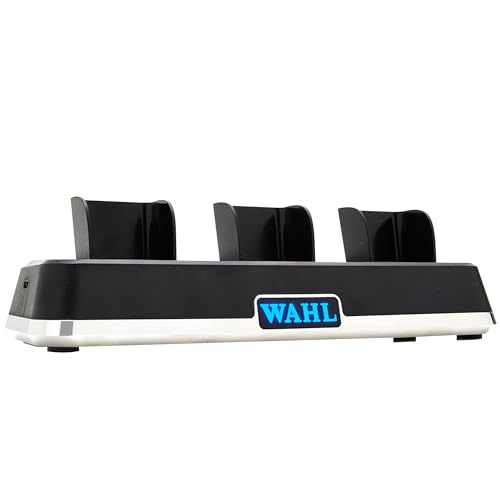
Efficient Multi-Tool Charging: The Wahl Professional Power Station charges multiple grooming tools simultaneously, ensuring they are always ready for use

Products Specification: Replacement for MANSCAPED 4.0 charging Dock: Input: 100-240V AC, 50-60Hz; Output: DC 5V; 4.9ft/1.5M longer power cord; Size:1.6×1.2×0.8inch|, replacement for MANSCAPED Charging Dock come with 4.9ft power cord USB Charger
Replace Your Blade Every 3 Months
Because hair, skin cells, and bacteria accumulate on the blade module over time, you’ll need to replace your trimmer’s blade every three months to maintain exceptional hygiene and cutting performance. However, your actual replacement schedule depends on usage frequency—daily grooming shortens blade longevity, while weekly trimming extends it closer to six months.
Follow these maintenance tips for best results: Hold your trimmer vertically with blade teeth facing upward. Press gently on the blade’s top with your thumb until it snaps out. Insert a new SkinSafe ceramic blade into the slot and press down until it clicks into place. The rounded, pre-lubricated design reduces nicks while resisting dirt and oil buildup. Ceramic blades are particularly effective at minimizing razor burn and irritation compared to traditional razors during intimate grooming. For optimal results, pair your trimmer with integrated beard trimmers that offer similar cutting power and precision. Replacement blades are priced around £20-25 and offer subscription options for convenient regular delivery. Regular replacement guarantees sharp blades that deliver maximum performance and protect your skin from irritation.

SNAP-IN BLADE MODULE: The snap-in ceramic blade module is compatible with The Lawn Mower 2.0, 3.0, and 4.0 series. When replaced every three months, you can keep your trimmer running smoothly and efficiently. Because it’s light years beyond other trimmers, The Lawn Mower snap-in blade module creates grooming experience like no other.

FOR THE DEDICATED MERIDIAN USER: with this single replacement blade you can feel fresh and confident trimming for 3 months straight.

✂【High Efficiency】: Low heat transfer and friction index of Ceramic keeps blades running 50 percent cooler than steel
Avoid Water Before Brushing and Never Submerge
While your Manscaped trimmer carries an IPX7 rating that withstands immersion in up to one meter of fresh water for 30 minutes, this waterproof certification doesn’t mean you should submerge the device or expose it to powerful water jets.
Before applying water, use the included brush to remove trimmed hair and debris. This essential maintenance tip prevents clogs and reduces water exposure time. When you’re ready to rinse, hold the trimmer under gentle sink flow rather than subjecting it to high-pressure spray. These cleaning techniques protect internal components from moisture damage. The modular blade design also allows you to remove and clean individual blade heads separately for more thorough maintenance. After rinsing, pat the trimmer dry with a soft cloth and allow it to air dry completely before storage to prevent corrosion and maintain optimal performance. For professional detailing work like neckline shaping, maintaining clean blades through proper brushing ensures precision and performance.
Never intentionally submerge your trimmer despite its IPX7 rating. Prolonged water exposure or pressure-washing risks compromising the sealed body. Following these methodical maintenance tips guarantees your device remains functional and durable.